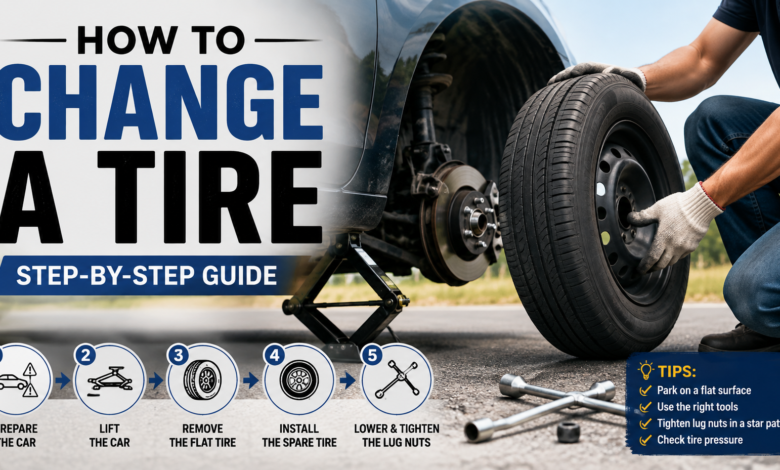
Knowing how to change a tire is one of those practical skills every driver should have. Even if you have roadside assistance, a flat tire can happen in an inconvenient place, at an inconvenient time. You might be on a quiet highway, heading home after work, or traveling through an area where help is not immediately available. Being able to handle the situation yourself can save time, reduce stress, and help you get back on the road safely.
Changing a tire may look complicated when you first see someone doing it, but the basic process is fairly straightforward. You need the right equipment, a safe location, and a little patience. The most important thing is not to rush. A tire change is a safety-related task, so taking a few extra minutes to prepare properly is much better than trying to finish as quickly as possible.
This guide explains how to change a tire from start to finish. It covers the tools you need, how to safely prepare your vehicle, how to remove the damaged tire, how to install the spare, and what you should do after the replacement. Once you understand the process, an unexpected flat tire becomes much less intimidating.
What You Need Before Changing a Tire
It would be wise to familiarize yourself with the equipment used in the process of changing a flat tire. Most of the cars that have a spare tire always come with an essential jack and lug wrench. The spare might be either placed under the trunk floor, within the trunk or below the rear end of the car. The information can be easily found in your vehicle’s owner’s manual.
The basic things that you will need during the process include the spare tire, jack, and the lug wrench. Other optional equipment includes the wheel chock. Gloves will help you avoid having your hands dirty, while a flashlight will always come handy if you will be changing your tire at night. It would also be wise to have a reflector vest, a warning triangle or any form of emergency light in your car.
It will always be wise to check on your spare tire from time to time. You cannot be sure that your spare is inflated after several years of storage in the trunk of your vehicle. The jack and lug wrench should also be available and in good condition.
Find a Safe Place to Stop
Safety considerations must always precede changing the tire itself. In case you find out that you have a flat tire while you are driving, do not make any sharp movements with your steering wheel or brakes. Slow down gradually and try to find a good spot to pull over. The best thing would be to stop on a flat surface that will provide a good ground for the jack.
Try to pull the car away from traffic, if it is possible. It is better to park your car in a parking lot or a wider shoulder than in a narrow roadside area. Flashing your hazard lights will alert approaching cars that your car is broken. If you have some warning triangles or a similar device, put them in accordance with the instructions.
Once the car stops, engage the parking brake and switch the engine off. Keep other people away from traffic. Do not stand next to the part of the car where it faces the incoming vehicles. In case the spot is too dangerous, especially on a busy highway, you should call for roadside assistance.
Secure the Vehicle Before Lifting It
The next important step in learning how to change a tire is making sure the vehicle cannot roll. Put the transmission in Park if your vehicle has an automatic transmission. For a manual transmission, follow the vehicle manufacturer’s guidance, which commonly involves selecting a low gear. The parking brake should also remain engaged.
If you have wheel chocks, place them appropriately to prevent movement. If you do not have chocks, another heavy object designed for this purpose may sometimes be useful, but never rely on an unstable object that could move unexpectedly. The goal is to minimize vehicle movement while you work.
Before putting the jack under the vehicle, locate the correct jacking point. Your owner’s manual should show exactly where it is. Never place the jack randomly underneath the vehicle, because doing so can damage components or cause the vehicle to become unstable. The correct jacking point is designed to support the vehicle’s weight safely.
Loosen the Lug Nuts Before Raising the Vehicle
With the vehicle still firmly on the ground, remove the hubcap if necessary to expose the lug nuts. Then use the lug wrench to loosen each lug nut. You generally do not need to remove them completely at this stage. Simply break their initial resistance and leave them attached.
Lug nuts can be extremely tight because they may have been installed with significant force. Place the wrench securely over the nut and turn it counterclockwise. If a nut refuses to move, make sure the wrench is properly seated rather than applying excessive force in an unsafe position.
This step is important because trying to loosen extremely tight lug nuts after the wheel is already off the ground can cause the wheel to rotate. Keeping the tire on the ground gives you more stability and makes it easier to apply controlled force.
Position the Jack Correctly
After loosening the lug nuts, position the jack underneath the manufacturer’s specified jacking point. Again, your owner’s manual is the best source for the exact location because jack points vary between vehicles.
Raise the jack slowly until it makes firm contact with the vehicle. Check that the jack is positioned correctly and remains stable before lifting the vehicle higher. Continue raising the vehicle until the flat tire is slightly off the ground. You only need enough clearance to remove the tire and install the spare.
Never put any part of your body underneath a vehicle supported only by a standard emergency jack. A jack is designed to lift the vehicle, not to serve as a permanent support. If additional support is needed for a repair, use equipment specifically designed for that purpose and follow appropriate safety procedures.
Remove the Flat Tire
Once the tire is off the ground, finish removing the loosened lug nuts. Keep them together somewhere they will not roll away or become contaminated with dirt. Then grip the tire firmly with both hands and pull it straight toward you.
A flat tire can be heavier than it looks, particularly on larger vehicles. If it feels difficult to remove, avoid putting yourself in an awkward position. Make sure the vehicle is stable and that all lug nuts have actually been removed.
After taking off the damaged wheel, place it flat on the ground away from traffic. Doing this keeps the work area organized and prevents the wheel from becoming a tripping hazard. It can also be useful as a temporary backup if the vehicle’s jack were ever to shift, although it should never be treated as a substitute for proper support equipment.
Install the Spare Tire
Now you can install the spare tire. Align the holes in the wheel with the wheel studs or mounting points on the vehicle. Push the spare onto the hub carefully until it sits properly.
Thread the lug nuts back onto the studs by hand. This is an important detail because starting the nuts by hand helps prevent cross-threading. Do not immediately use the wrench to force them into place. Turn each nut several times by hand until you are confident that it is properly aligned.
Once all the lug nuts are installed, tighten them lightly with the lug wrench. Do not fully tighten them while the tire is still completely off the ground. The final tightening should generally be done after the vehicle has been lowered enough for the tire to make firm contact with the ground.
Lower the Vehicle and Tighten the Lug Nuts
Slowly lower the vehicle using the jack until the spare tire is firmly touching the ground. You can then remove the jack completely if appropriate. Keep your movements controlled and make sure nobody is positioned underneath or immediately beside the vehicle during this process.
Use the lug wrench to tighten the lug nuts securely. Tighten them in a crisscross or star pattern rather than simply going around the wheel in a circle. This helps distribute the clamping force more evenly across the wheel.
For the correct final tightening force, use the torque specification provided by the vehicle manufacturer. A torque wrench is the best tool for achieving the specified value. If you do not have one, tighten the nuts firmly according to the manufacturer’s guidance and have the wheel checked with a torque wrench as soon as practical.
Check the Spare Tire Before Driving
Once the tire has been installed, do not immediately drive away without checking your work. Make sure every lug nut is installed and tightened properly. Confirm that the spare tire is sitting correctly and that you have removed all tools from around the vehicle.
Check the spare’s air pressure before driving whenever possible. Spare tires can have different pressure requirements from the regular tires, so do not automatically assume that the pressure printed on your normal tires applies to the spare.
You should also check whether your vehicle uses a temporary compact spare. These smaller spare tires are generally designed for limited use and may have restrictions on speed and driving distance. Follow the instructions printed on the spare and in your owner’s manual. A temporary spare is meant to help you reach a safe destination or tire shop, not necessarily to replace the regular tire permanently.
What to Do With the Flat Tire
After you successfully change the tire, put the damaged tire and your equipment back into the vehicle. If the flat tire is too damaged to fit into its normal storage location, secure it properly so it does not move around while driving.
Do not assume that a flat tire is automatically beyond repair. Some punctures, particularly small punctures in the tread area, may be repairable depending on their location and the condition of the tire. Damage to the sidewall, severe structural damage, or driving extensively on a completely flat tire may require replacement.
Take the damaged tire to a qualified tire professional for inspection. They can determine whether it can be safely repaired or whether a replacement is necessary. If the tire is repaired, make sure it is properly inflated before returning to normal driving.
Common Mistakes to Avoid When Changing a Tire
One of the biggest mistakes people make when learning how to change a tire is failing to choose a safe location. A perfectly performed tire change is still dangerous if the vehicle is positioned too close to fast-moving traffic. If the roadside is narrow or visibility is poor, professional roadside assistance may be the safer option.
Another common mistake is placing the jack in the wrong location. Vehicle construction differs considerably between models, and lifting from an unsuitable point can cause damage or instability. Always check the owner’s manual if you are unfamiliar with the vehicle.
People also sometimes forget to check the spare tire’s condition. A spare that is severely underinflated or damaged is not a reliable solution. Making periodic checks part of your normal vehicle maintenance routine can prevent an unpleasant surprise when you actually need it.
When You Should Call for Professional Help
Although learning how to change a tire is useful, there are situations where calling a professional is the smarter decision. If the vehicle is located on a dangerous section of highway, the weather is severe, or you do not have the necessary equipment, do not put yourself at unnecessary risk.
Professional help is also appropriate if the wheel is stuck, the lug nuts cannot be safely removed, or the vehicle does not have a usable spare. Modern vehicles may use tire repair kits or run-flat tires instead of traditional spare tires, so the correct procedure can vary.
If you are uncomfortable with any stage of the process, there is no shame in asking for assistance. The purpose of learning how to change a tire is to give you another option in an emergency, not to encourage you to take unnecessary risks.
Final Thoughts on How to Change a Tire
Understanding how to change a tire is a valuable piece of basic vehicle knowledge. The process involves preparing a safe work area, securing the vehicle, loosening the lug nuts, lifting the vehicle at the correct point, replacing the damaged wheel, and tightening everything properly.
The key is to stay calm and work methodically. Do not rush simply because you are eager to get back on the road. Double-check the jack position, lug nuts, spare tire pressure, and any manufacturer instructions before driving.
Most importantly, remember that a spare tire is often a temporary solution. Once you are safely back on the road, have the original tire inspected and repaired or replaced as necessary. With the right preparation and a little practice, knowing how to change a tire can turn an otherwise stressful roadside problem into a manageable task.
You May Also Read: Infographic Examples